9 Tips for Tying Better Dry Flies


Tip 1
Use the Hook as a Measuring Device
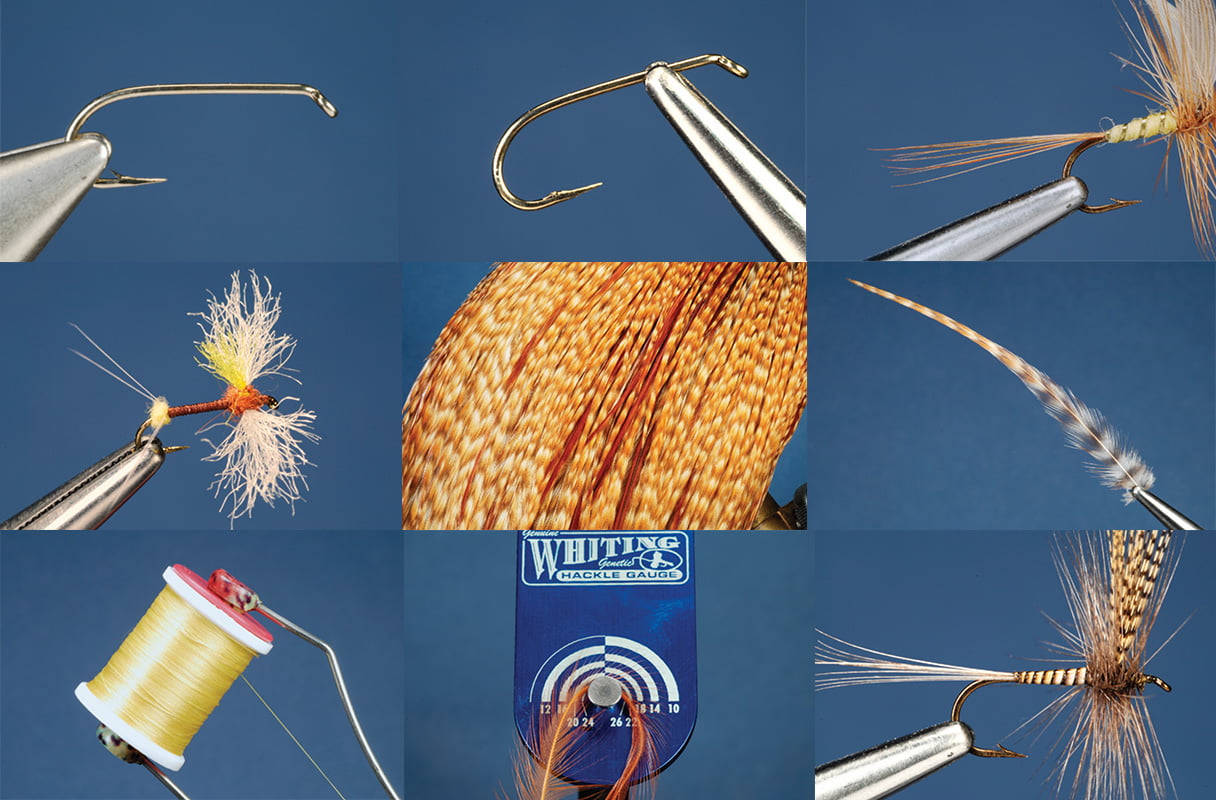
One of the hallmarks of an accomplished tier is that all his flies display similar proportions. The hook is a handy tool for measuring the components of a fly. Use the overall length of the hook, the length of the shank, the width of the gap, the distance between the tip of the point and tip of the barb, and so on to measure the length of the tail, the height of the wings, and other parts of a pattern. All your flies will look alike, and when you change hook sizes, you’ll easily maintain the same relative proportions.
 Tip 2
Tip 2
De-barb the Hook Before Tying the Fly
Do you subscribe to the catch-and-release ethic? In order to facilitate releasing your fish quickly and unharmed, you should use barbless hooks. While the vast majority of hooks are properly tempered and can withstand considerable abuse, sometimes a hook will snap when you are mashing down the barb using a pliers or hemostat; this problem is more common with fine-wire dry fly hooks. If you plan on “fishing barbless,” remove the hook barb before tying the fly; if the hook does break—a rare but not impossible occurrence—you will not waste time or materials tying a fly you will never use.
 Tip 3
Tip 3
Adjust Your Bobbin to Accommodate Extrafine Thread
If you tie dry flies using size 8/0 (70 denier) or finer nylon thread, first reduce the tension on your bobbin. Did you even know that a standard thread bobbin is adjustable? It’s very simple to do: slightly bend out the legs of the bobbin to reduce the pressure on the sides of the thread spool. The bobbin should apply only enough pressure to the sides of the spool so that when you release the thread, the tool hangs from the hook without dropping to your bench top, but not so much pressure that you continually break the thread when tying the fly.
 Tip 4
Tip 4
Spinners Are Important
In addition to tying imitations of newly emerging mayflies, be sure to make a few spinners. Spinners are the egg-laying stage of these insects. A spinner is far less complicated to tie than a dun imitation. A splayed tail of hackle fibers, a dubbed body, and a sparse piece of polypropylene yarn tied perpendicular to the hook shank yield a fly that matches the outline of almost any real spinner. Fly tying expert Dennis Potter added a small piece of bright yellow yarn to the top of this spinner to make it easy to see on the water.
 Tip 5
Tip 5
Save Money Using Variant Hackle
Quality hackles are some of the most expensive ingredients in tying dry flies. A premium cape (a cape is the skin from the neck of a chicken that contains hackles) can easily cost $50 or more. And, if you tie a wide variety of patterns, you’ll need capes in an assortment of colors. But there is a way to use high-quality hackles at a more affordable price. Ask for “variant” colored hackle capes at your local fly shop. If the shopkeeper isn’t familiar with the term, ask to see his selection of grade 3 capes; these are often variants. The feathers on a variant cape contain various shading or speckling; they will not be one uniform color. Because of the uneven shading, these capes are not considered grade 1 or grade 2. The individual feathers on a variant cape, however, are still ideal for tying flies. And, because few insects are solid colors, variant hackles probably yield more realistic-looking flies.
 Tip 6
Tip 6
Find the Sweet Spot of the Hackle
Did you know that a dry fly hackle has a “sweet spot”? This is the part of the feather you want to use to wrap around the hook to create a hackle collar. The sweet spot is the part of the feather where the quill, which is the stem running up the middle of the feather, is very narrow. The sweet spot typically begins about one-third of the way from the base of the hackle; the quill in the bottom one-third of the feather is thicker and will add too much bulk to the fly. Strip all the fibers from the bottom one-third of the feather, clip off most of the thick stem, and then tie the hackle to the hook.
Tip 7
Spade Fibers for the Tail of the Fly
Fly tying legend and longtime American Angler and Fly Tyer contributing author Dick Talleur tied the tails of his high-floating dry flies using fibers from spade hackles. Spade hackles are the feathers found on the sides of a hackle cape. The overall shapes of the feathers do not lend themselves to making nice wrapped collars, but the fibers on these hackles are very stiff and ideal for making tails.
Pluck a spade hackle from the side of the dry fly cape. Strip enough fibers to make the tail of the fly; a real mayfly has three tails, but I prefer 8 to 10 fibers to help the fly float. Measure the bunch of fibers against the hook to determine the length of the finished tail; the overall length of the hook or the length of the hook shank work best. Tie the fibers to the top of the hook shank.
 Tip 8
Tip 8
Make Your Own Stripped Peacock Herl
A lot of older patterns call for bodies made using stripped peacock herl; the lovely body on this classic Quill Gordon features a strippedherl body. I suspect you will not find packages of stripped herl in your local fly shop, so you’ll have to make your own. First, you can immerse a bunch of herl in a 50/50 solution of water and bleach to “burn” the fine fibers from the herl. (Quickly wash the solution from the stripped herl in clean water at the end of the burning process.) The second method is to remove the fibers from the herl using an ordinary pencil eraser. Simply stretch a piece of herl on your bench between the thumb and forefinger of one hand, and lightly erase the green fibers from the material.
 Tip 9
Tip 9
Use a Hackle Gauge
Do you have trouble selecting the right hackle to match the hook size you are using? This is a common problem, but there is a simple solution: Use a hackle gauge. A hackle gauge is a simple tool used to measure the lengths of the fibers on a feather. Let’s pretend we’re tying a size 10 March Brown and need a hackle to match. Look for the medium-size feathers on a brown hackle cape. Pluck one of the hackles from the cape. Bend the feather around the post on the gauge to splay the fibers. The fibers extend out from the post to a series of lines marked by hook size. If the fibers are too short or long, select a larger or smaller hackle.


